At the Apache SeaTunnel&Apache Doris Joint Meetup held on July 24, Liu Li — senior engineer of WhaleOps and contributor to Apache SeaTunnel — mentioned an easy way to develop a connector in SeaTunnel quickly.
 We’ll divide it into four key parts:
● The definition of a Connector
● How to access data sources and targets
● Code to demonstrate how to implement a Connector
● Sources and targets that are currently supported
Definition of a Connector
The Connector consists of Source and Sink and is a concrete implementation of accessing data sources.
Source: The Source is responsible for reading data from sources such as MySQLSource, DorisSource, HDFSSource, TXTSource, and more.
Sink: The Sink is responsible for writing read data to the target, including MySQLSink, ClickHouseSink, HudiSink, and more. Data transfer, and more specifically, data synchronization is completed through the cooperation between the Source and Sink.

Of course, different sources and sinks can cooperate with each other.
For example, you can use MySQL Source, and Doris Sink to synchronize data from MySQL to Doris, or even read data from MySQL Source and write to HDFS Sink.
How to access data sources and targets
How to access Source
Firstly, let’s take a look at how we can access the Source. To elaborate, let’s dive in and check out how we can implement a source and the core interfaces that need to be implemented to access the Source.
The simplest Source is a single concurrent Source. However, if a source does not support state storage and other advanced functions, what interfaces should we implement in these simple single concurrent sources?
Firstly, we need to use getBoundedness in the Source to identify whether the Source supports real-time or offline, or both.
createReader creates a Reader whose main function is to read the specific implementation of data. A single concurrent source is really simple as we only need to implement one method, pollNext, through which the read data is sent.
If concurrent reading is required, what additional interfaces should we implement?

For concurrent reading, we’ll introduce a new member, called the Enumerator.
We implement createEnumerator in Source, and the main function of this member is to create an Enumerator to split the task into segments and then send it to the Reader.
For example, a task can be divided into 4 splits.
If it is concurrent twice, it’ll correspond to two Readers. Two of the four splits will be sent to Reader1, and the other two will be sent to Reader2.
If the number of concurrencies is more — for example, let’s say there are four concurrences, then you have to create four Readers. You have to use the corresponding four splits for concurrent reading for improved efficiency.
A corresponding interface in the Enumerator called the addSplitsBack sends the splits to the corresponding Reader. Through this method, the ID of the Reader can be specified.
Similarly, there is an interface called the addSplits in the Reader to receive the splits sent by the Enumerator for data reading.
In a nutshell, for concurrent reading, we need an Enumerator to implement task splitting and send the splits to the reader. Also, the reader receives the splits and uses them for reading.
In addition, if we need to support resuming and exactly-once semantics, what additional interfaces should we implement?
If the goal is to resume the transfer from a breakpoint, we must save the state and restore it. For this, we need to implement a restoreEnumerator in Source.
The restoreEnumerator method is used to restore an Enumerator through the state and restore the split.
Correspondingly, we need to implement a snapshotState in this enumerator, which is used to save the state of the current Enumerator and perform failure recovery during checkpoints.
At the same time, the Reader will also have a snapshotState method to save the split state of the Reader.
In the event of a failed restart, the Enumerator can be restored through the saved state. After the split is restored, reading can be continued from the place of failure, including fetching and incoming data.
The exact one-time semantics actually requires the source to support data replays, such as Kafka, Pulsar, and others. In addition, the sink must be submitted in two phases, i.e., the precise one-time semantics can be achieved with the cooperation of these two sources and sinks.
How to access Sink
Now, let’s take a look at how to connect to the Sink. What interfaces does the Sink need to implement?
Truth be told, Sink is relatively simple. For concurrent sinks, when state storage and two-phase commit are not supported, the Sink is simple.
To elaborate, the Sink does not distinguish between stream synchronization and batch synchronization as the Sink — and the entire SeaTunnel API system — supports Unified Stream and Batch Processing.
Firstly, we need to implement createWriter. A Writer is used for data writing.
You need to implement a writer method in Writer through which data is written to the target library.

As shown in the figure above, if two concurrencies are set, the engine will call the createWriter method twice in order to generate two Writers. The engine will feed data to these two writers, which will write the data to the target through the write method.
For a more advanced setup, for example, we need to support two-phase commit and state storage.
Here, what additional interfaces should we implement?
First, let’s introduce a new member, the Committer, whose main role is for the second-stage commit.

Since Sink is stored in state, it is necessary to restore Writer through the state. Hence, restoreWriter should be implemented.
Also, since we have introduced a new member, the Committer, we should also implement a createCommitter in the sink. We can then use this method to create a Committer for the second-stage commit or rollback.
In this case, what additional interfaces does Writer need to implement?
Since it is a two-phase commit, the first-phase commit is done in the Writer through the implementation of the prepareCommit method — which is mainly used for the first-phase commit.
In addition, state storage and failure recovery is also supported, meaning we need snapshotState to take snapshots at checkpoints. This saves the state for failure recovery scenarios.
The Committer is the core here. It is mainly used for rollback and commit operations in the second phase.
For the corresponding process, we need to write data to the database. Here, the engine will trigger the first stage commit during the checkpoint, and then the Writer needs to prepare a commit.
At the same time, it will return commitInfo to the engine, and the engine will judge whether the first stage commits of all writers are successful.
If they are indeed successful, the engine will use the commit method to actually commit.
For MySQL, the first-stage commit just saves a transaction ID and sends it to the commit. The engine determines whether the transaction ID is committed or rolled back.
How to implement the Connector
We’ve taken a look at Source and Sink; let’s now look at how to access the data source and implement your own Connector.
Firstly, we need to build a development environment for the Connector.
The necessary environment
Java 1.8\11, Maven, IntelliJ IDEA
Windows users need to additionally download gitbash (https://gitforwindows.org/)
Once you have these, you can download the SeaTunnel source code by cloning the git.
Download SeaTunnel source code 1, git clone https://github.com/apache/incubator-seatunnel.git2, cd incubator-seatunnel
SeaTunnel Engineering Structure
We then open it again through the IDE, and see the directory structure as shown in the figure:

The directory is divided into several parts:
- Connector — v2
Specific implementation of the new Connector(Connector — v2) will be placed in this module.
- connector-v2-dist
The translation layer of the new connector translates into specific engine implementation — instead of implementing under corresponding engines such as Spark, Flink, and ST-Engine. ST-Engine is the “important, big project” the community is striving to implement. This project is worth the wait.
- examples
This package provides a single-machine local operation method, which is convenient for debugging while implementing the Connector.
- e2e
The e2e package is for e2e testing of the Connector.
Next, let’s check out how a Connector can be created (based on the new Connector). Here is the step-by-step process:
Create a new module in the seatunnel-connectors-v2 directory and name it this way: connector-{connector name}.
The pom file can refer to the pom file of the existing connector and add the current child model to the parent model’s pom file.
Create two new packages corresponding to the packages of Source and Sink, respectively:
a. org.apache.seatunnel.connectors.seatunnel.{connector name}.source
b. org.apache.seatunnel.connectors.seatunnel.{connector name}.sink
Take this mysocket example shown in the figure:

To do some implementation, develop the connector. During implementation, you can use the example module for local debugging if you need to debug. That said, this module mainly provides the local running environment of Flink and Spark.

As you can see in the image, there are numerous examples under the “Example” module — including seatunnel-flink-connector-v2-example.
So how do you use them?
Let’s take an example. The debugging steps on Flink are as follows (these actions are under the seatunnel-flink-connector-v2-example module:
Add connector dependencies in pom.xml
Add the task configuration file under resources/examples
Configure the file in the SeaTunnelApiExample main method
Run the main method
Code Demo
This code demonstration is based on DingTalk.
Here’s a reference( 19:35s–37:10s):
https://weixin.qq.com/sph/A1ri7B

New Connectors supported at this stage
As of July 14, contributions and statistics for the completed connectors are welcome. You are more than welcome to try them out, and raise issues in our community if you find bugs.
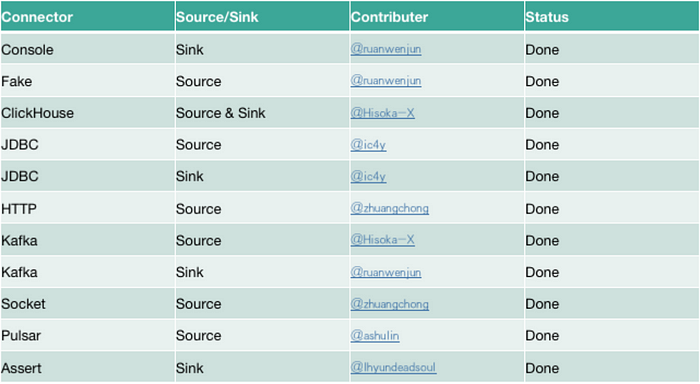
The Connector shared below have already been claimed and developed:
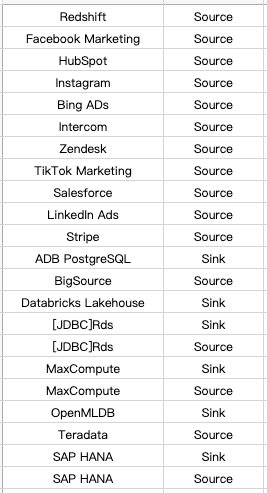
Also, we have Connectors in the roadmap — the connectors we want to support in the near future. To foster the process, the SeaTunnel Community initiated SeaTunnel Connector Access Incentive Plan, you are more than welcome to contribute to the project.
SeaTunnel Connector Access Incentive Plan: https://github.com/apache/incubator-seatunnel/issues/1946
You can claim tasks that haven’t been marked in the comment area, and take a spree home! Here is part of the connectors that need to be accessed as soon as possible:
 In fact, the implementations of Connectors like Feishu, DingTalk, and Facebook messenger are quite simple as the connectors do not need to carry a large amount of data (just a simple Source and Sink). This is in sharp contrast to Hive and other databases that need to consider transaction consistency or concurrency issues.
We welcome everyone to make contributions and join our Apache SeaTunnel family!
About SeaTunnel
SeaTunnel (formerly Waterdrop) is an easy-to-use, ultra-high-performance distributed data integration platform that supports the real-time synchronization of massive amounts of data and can synchronize hundreds of billions of data per day stably and efficiently.
Why do we need SeaTunnel?
SeaTunnel does everything it can to solve the problems you may encounter in synchronizing massive amounts of data.
- Data loss and duplication
- Task buildup and latency
- Low throughput
- Long application-to-production cycle time
- Lack of application status monitoring
SeaTunnel Usage Scenarios
- Massive data synchronization
- Massive data integration
- ETL of large volumes of data
- Massive data aggregation
- Multi-source data processing
Features of SeaTunnel
- Rich components
- High scalability
- Easy to use
- Mature and stable